Wednesday, December 30, 2009
Motor mount drawings.
I have gotten a request for dimensional drawings of the motor mounts that I came up with. Sorry to say that I don't have any CAD drawings of them. I'm more of a make it by feel person when it comes to one off parts of this nature. I can tell you though that I attached some card stock with spray adhesive to the original Audi mounts, then I used a ball peen hammer to gently punch out the bolt holes, after which I transferred the the card stock to .250" thick plate steel and cut out the rough shape. Once both plates where made I bolted them to the motor. The drivers side mount is more involved because the original mount is z shaped. Making a z shaped mount would have proven difficult for me plus there was an issue with a bolt hole being covered by the support tube. I ended up making the mount from flat stock with a standoff welded to the backside of the mount to compensate for the original z shape. This also eliminated the problem of the support tube covering a bolt hole. How you make the feet will depend on which motor mount you decide to use. I recommend something very hard to really limit movement of the motor, there just isn't enough room around the motor for it to be swinging about without hitting something. After I made the feet and had them mounted where the original Porsche mounts where, I used PVC pipe to quickly develop what the connecting pipe should look like. Once that was done I made a new one in .120" x 1.500" OD tube and welded it into position. I started with the passenger side mount and then the drivers side mount. Things to be aware of are that the motor doesn't' want to hang from the hoist at the right angle. I used a ratchet strap to correct this during mock up. Also repeatedly make sure that your height and lateral positioning are correct during the process. If I remember correctly it was 13.5" from the crank bolt to each frame rail to keep it centered. The height has a very small window in which the pan will not hit the frame, but the hood will still close. I will measure it again, but iirc the bottom of the lowest point of the block needs to be 1" from the cross member, this will leave about .500" for the passenger side of the oil pan and .500" for clearance. Take all this with a grain of salt though as I am in the process of making the pan right now and will make updates as problems arise. I will post pics of the mounts when they are removed for powder coating, that should help out if there is any confusion.
Tuesday, December 22, 2009
Filter relocator
I did receive the filter relocator and I think it will be perfect. Its threads are correct for the block, but it doesn't come with the threaded tube. I still have to get that part yet, however this will save a ton of space and move some of the oil lines away from the turbo and exhaust. One thing to be aware of is that mine has casting flash and residue from being threaded still evident in photo two. Be sure to check for this if you use one.
.
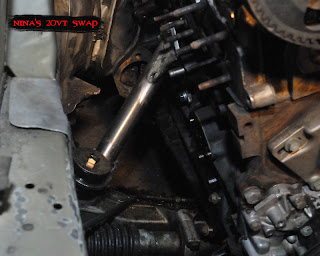
Motor mount pics
Here are the pics that I promised. I wish that they were better, but it is hard to fit my camera in there. I will put up some more when I have them powder coated for the final installation. First is the drivers side, second the passenger side.


Sunday, December 20, 2009
Motor mounts finished
I finished up the motor mounts today and I think they came out pretty nice. The actual isolation pad is made from polyurethane. I figured that the weight of the motor would compress them some so I tried to compensate by hanging the motor a little higher than I wanted it to actually be. After completing the mounts and lowering the engine into the car they didn't compress like I thought they would. I have 1 inch of clearance on the p/s of the engine for the oil pan, but I'm worried that the hood isn't going to close now. I really wanted the exterior of the car to remain unchanged. I could probably have some of the isomounts shaved off at a machine shop and still use the current engine mounts.
I also cut the reservoir off of the donor oil pan to make way for a 944 like sump. Since I have a weeks vacation starting soon I should wrap that project up pretty quickly.
One last note is that I have located a HY35 and it is en route, so we'll get to see if that will fit under the hood also. If rumors are correct I should be able to hit my horsepower goal of roughly 400bhp. It will be months before we learn the reality of the situation though. As there is much to complete first. I will post pics of my mounts soon and the turbo when it arrives.
Tuesday, December 15, 2009
Slow going
I'm sorry that I haven't been getting a lot of info up here lately. I have been working on it on the weekends when I can, but work and the holidays are really putting a dent in my schedule. I have completed the p/s motor mount and the d/s motor mount is about 50% finished. I'm using a polyurethane engine mounts that I am sure will compress under the weight of the engine, I just don't know how much. I'm trying to get the engine close to the hood to leave more room for the oil pan. I won't be happy if it doesn't fit under the hood. Also I have changed my mind about the turbo. I'm now searching for a serviceable Holset hy35 with a 9cm housing from a Cummings diesel truck engine. I think this looks to be a very good match for this motor. They have been used rarely on Audi's, but with good results. Part of my reasoning is price. Garrett = 1300 USD, Holset hy35 = approx. 200 USD. The savings is almost the cost of the vems ecu or perhaps an lsd transaxle. Reason 2 is of a surging issue that I keep hearing about with the Garrett turbo that I was after. Reason 3 is that Garretts aren't really rebuildable, but a Holset is easy and cheap to rebuild. Reason 4 is that the Holset isn't water cooled, thus simplifying installation and allowing the removal of more weight and components from the AAN. The final reason is that this car is all about taking the less traveled road so....why not.
Subscribe to:
Posts (Atom)