Saturday, January 30, 2010
Clutch problems
I have been researching clutch options lately. I really want to set the car up with a twin disk unit, but it looks like the flywheel will have to be custom machined. That equates to some serious dollars for a chunk of steel. It just baffles me that I can't find someone that makes a flywheel for this application. If I decide to go with the twin disk unit it will most likely be a Quarter Master 7.25" unit. On the other hand I could use a Fidanza aluminum flywheel and something like a Southbend clutch. If someone knows where to get a flywheel for the minidisk, please drop me a line. I know that there are plenty of lower budget alternatives to make it work, but I'm looking for a fast revving engine to get the turbo spooled up as quickly as possible. Sure I'm going to sacrifice some drive-ability with either setup, but this isn't a DD car either. I'll keep searching and post the results.
Tial parts arrive
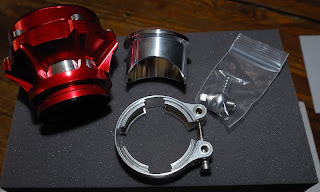
I wanted to show off the awesome parts that arrived this week courtesy of my new friend John O'Connell at the Turbo Center in St.Louis. Seems that they are a full service turbo shop located in my home state. They can rebuild, balance, and fab up parts for your turbo system. I wouldn't have known about them at all, but luckily when I called Tial looking for a distributor they gave me their phone number. If your looking for competitive pricing in the Midwest and great service give them a call at (314) 481-3778. I was really surprised by the packaging. I'm not sure what I expected, but I was impressed. The parts are really nice looking also, hopefully they perform just as well. BTW the wastegate is the newer Tial MV-S and the BOV is the Tial Q. Here are a few pics.


Now I need to return to the shop and finish the oil pan today.


Now I need to return to the shop and finish the oil pan today.
Sunday, January 24, 2010
Oil pump pickup tube
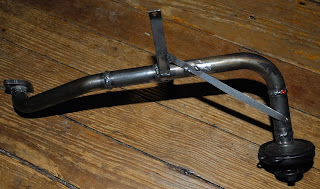
The pickup tube is complete. I ended up using parts from two pickup assemblies and some new tubing also. I didn't want to have so many joints in it, but I don't have a bender for this size of tubing. When you make this take your time and make sure that it follows the windage tray closely so it doesn't hit the shallow pan. I didn't care for the amount of tube that extended past the point for the braces so I added in a piece of strap to protect the assembly from vibration. Hopefully this design is adequate because if it breaks the motor isn't going to be happy with me. I'll finish the oil pan this week and post some pictures. By then the rest of my parts for the turbo manifold should be here and I can get started on that. Here are a couple of pics of the pickup tube.


Wednesday, January 20, 2010
Exhaust manifold flange
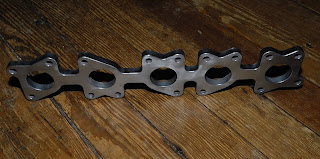
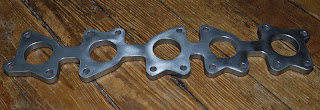
Well I had every intention of making my own manifold flange from some bar stock to save some money and also to get one in mild steel. However I am running out of time to get this project wrapped before the autocross season starts and just happened to notice that EFI Express is now carrying one in mild steel. So I ordered one from them at the end of last week. This thing is nice! If you need one in mild steel this is the only place I know of to get it. If your tastes are stainless, then 034 Motorsports can hook you up. Here are two pics I snapped for you guys.


I almost have the oil pan finished up I just need to wrap up the pick up tube assembly before I weld the back of the pan into place. I'll drop it off at the powder coater as soon as it is finished. Also on the way are some Tial products and the t3 flange.
Wednesday, December 30, 2009
Motor mount drawings.
I have gotten a request for dimensional drawings of the motor mounts that I came up with. Sorry to say that I don't have any CAD drawings of them. I'm more of a make it by feel person when it comes to one off parts of this nature. I can tell you though that I attached some card stock with spray adhesive to the original Audi mounts, then I used a ball peen hammer to gently punch out the bolt holes, after which I transferred the the card stock to .250" thick plate steel and cut out the rough shape. Once both plates where made I bolted them to the motor. The drivers side mount is more involved because the original mount is z shaped. Making a z shaped mount would have proven difficult for me plus there was an issue with a bolt hole being covered by the support tube. I ended up making the mount from flat stock with a standoff welded to the backside of the mount to compensate for the original z shape. This also eliminated the problem of the support tube covering a bolt hole. How you make the feet will depend on which motor mount you decide to use. I recommend something very hard to really limit movement of the motor, there just isn't enough room around the motor for it to be swinging about without hitting something. After I made the feet and had them mounted where the original Porsche mounts where, I used PVC pipe to quickly develop what the connecting pipe should look like. Once that was done I made a new one in .120" x 1.500" OD tube and welded it into position. I started with the passenger side mount and then the drivers side mount. Things to be aware of are that the motor doesn't' want to hang from the hoist at the right angle. I used a ratchet strap to correct this during mock up. Also repeatedly make sure that your height and lateral positioning are correct during the process. If I remember correctly it was 13.5" from the crank bolt to each frame rail to keep it centered. The height has a very small window in which the pan will not hit the frame, but the hood will still close. I will measure it again, but iirc the bottom of the lowest point of the block needs to be 1" from the cross member, this will leave about .500" for the passenger side of the oil pan and .500" for clearance. Take all this with a grain of salt though as I am in the process of making the pan right now and will make updates as problems arise. I will post pics of the mounts when they are removed for powder coating, that should help out if there is any confusion.
Tuesday, December 22, 2009
Filter relocator
I did receive the filter relocator and I think it will be perfect. Its threads are correct for the block, but it doesn't come with the threaded tube. I still have to get that part yet, however this will save a ton of space and move some of the oil lines away from the turbo and exhaust. One thing to be aware of is that mine has casting flash and residue from being threaded still evident in photo two. Be sure to check for this if you use one.
.
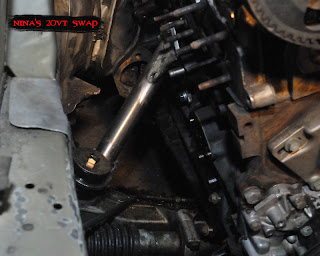
Motor mount pics
Here are the pics that I promised. I wish that they were better, but it is hard to fit my camera in there. I will put up some more when I have them powder coated for the final installation. First is the drivers side, second the passenger side.


Subscribe to:
Comments (Atom)