Wednesday, December 30, 2009
Motor mount drawings.
I have gotten a request for dimensional drawings of the motor mounts that I came up with. Sorry to say that I don't have any CAD drawings of them. I'm more of a make it by feel person when it comes to one off parts of this nature. I can tell you though that I attached some card stock with spray adhesive to the original Audi mounts, then I used a ball peen hammer to gently punch out the bolt holes, after which I transferred the the card stock to .250" thick plate steel and cut out the rough shape. Once both plates where made I bolted them to the motor. The drivers side mount is more involved because the original mount is z shaped. Making a z shaped mount would have proven difficult for me plus there was an issue with a bolt hole being covered by the support tube. I ended up making the mount from flat stock with a standoff welded to the backside of the mount to compensate for the original z shape. This also eliminated the problem of the support tube covering a bolt hole. How you make the feet will depend on which motor mount you decide to use. I recommend something very hard to really limit movement of the motor, there just isn't enough room around the motor for it to be swinging about without hitting something. After I made the feet and had them mounted where the original Porsche mounts where, I used PVC pipe to quickly develop what the connecting pipe should look like. Once that was done I made a new one in .120" x 1.500" OD tube and welded it into position. I started with the passenger side mount and then the drivers side mount. Things to be aware of are that the motor doesn't' want to hang from the hoist at the right angle. I used a ratchet strap to correct this during mock up. Also repeatedly make sure that your height and lateral positioning are correct during the process. If I remember correctly it was 13.5" from the crank bolt to each frame rail to keep it centered. The height has a very small window in which the pan will not hit the frame, but the hood will still close. I will measure it again, but iirc the bottom of the lowest point of the block needs to be 1" from the cross member, this will leave about .500" for the passenger side of the oil pan and .500" for clearance. Take all this with a grain of salt though as I am in the process of making the pan right now and will make updates as problems arise. I will post pics of the mounts when they are removed for powder coating, that should help out if there is any confusion.
Tuesday, December 22, 2009
Filter relocator
I did receive the filter relocator and I think it will be perfect. Its threads are correct for the block, but it doesn't come with the threaded tube. I still have to get that part yet, however this will save a ton of space and move some of the oil lines away from the turbo and exhaust. One thing to be aware of is that mine has casting flash and residue from being threaded still evident in photo two. Be sure to check for this if you use one.
.
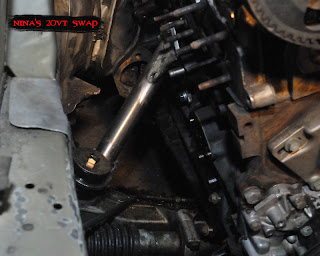
Motor mount pics
Here are the pics that I promised. I wish that they were better, but it is hard to fit my camera in there. I will put up some more when I have them powder coated for the final installation. First is the drivers side, second the passenger side.


Sunday, December 20, 2009
Motor mounts finished
I finished up the motor mounts today and I think they came out pretty nice. The actual isolation pad is made from polyurethane. I figured that the weight of the motor would compress them some so I tried to compensate by hanging the motor a little higher than I wanted it to actually be. After completing the mounts and lowering the engine into the car they didn't compress like I thought they would. I have 1 inch of clearance on the p/s of the engine for the oil pan, but I'm worried that the hood isn't going to close now. I really wanted the exterior of the car to remain unchanged. I could probably have some of the isomounts shaved off at a machine shop and still use the current engine mounts.
I also cut the reservoir off of the donor oil pan to make way for a 944 like sump. Since I have a weeks vacation starting soon I should wrap that project up pretty quickly.
One last note is that I have located a HY35 and it is en route, so we'll get to see if that will fit under the hood also. If rumors are correct I should be able to hit my horsepower goal of roughly 400bhp. It will be months before we learn the reality of the situation though. As there is much to complete first. I will post pics of my mounts soon and the turbo when it arrives.
Tuesday, December 15, 2009
Slow going
I'm sorry that I haven't been getting a lot of info up here lately. I have been working on it on the weekends when I can, but work and the holidays are really putting a dent in my schedule. I have completed the p/s motor mount and the d/s motor mount is about 50% finished. I'm using a polyurethane engine mounts that I am sure will compress under the weight of the engine, I just don't know how much. I'm trying to get the engine close to the hood to leave more room for the oil pan. I won't be happy if it doesn't fit under the hood. Also I have changed my mind about the turbo. I'm now searching for a serviceable Holset hy35 with a 9cm housing from a Cummings diesel truck engine. I think this looks to be a very good match for this motor. They have been used rarely on Audi's, but with good results. Part of my reasoning is price. Garrett = 1300 USD, Holset hy35 = approx. 200 USD. The savings is almost the cost of the vems ecu or perhaps an lsd transaxle. Reason 2 is of a surging issue that I keep hearing about with the Garrett turbo that I was after. Reason 3 is that Garretts aren't really rebuildable, but a Holset is easy and cheap to rebuild. Reason 4 is that the Holset isn't water cooled, thus simplifying installation and allowing the removal of more weight and components from the AAN. The final reason is that this car is all about taking the less traveled road so....why not.
Sunday, November 22, 2009
The Oil Pan


Oil filter clearance
I began lowering the motor into the 944s engine bay last weekend. Well the farther you lower it the more items you have to remove. It is currently in position and bolted to the torque tube. I think that if you made allowances with wiring and plumbing it would be possible to change a clutch in the future by moving the engine forward instead of the fiasco that occurs on a stock 944. There is a large amount of room in front of the motor compared to the original engine. So on to the topic of this post. You will find that the oil filter will land right on the top of the steering rack. Aah crap...that's what went through my mind. So I removed the filter and lowered it to the right height. While there isn't enough room for the stock filter there does appear to be room for a part made by Trans Dapt. The part number is 1413. They call it a 90 degree oil bypass adapter. Here is what it looks like.

You wont find the AAN listed in the applications guide, but cross referencing the AAN oil filter over to units that are listed in the guide indicates which model to use. Turns out that the Audi uses a Ford oil filter. I thought that was funny for some reason. So the plan for oil filtration at this point is to relocate the filter while retaining the factory cooler and turbo connection points. The filter will mount onto either these two items.
The 1028 vertical filter mount

or the 1045 horizontal filter mount

At this point I would imagine that I will be using the 1045, but I'll leave that decision until later.

The 1028 vertical filter mount


Sunday, November 8, 2009
Engine fitting
Well I was able to trial fit the motor into the 944 today. It became really obvious that the stock exhaust manifold won't work unless you tilt the motor clockwise. (as viewed from the front of the car) I know that the guy in Russia tilted his motor for some reason. I assumed it was so that it would fit under the hood, but maybe it was to make use of the stock turbo manifold. I'll have to go review the videos and see if I can tell. I couldn't get the engine lowered into place completely due to clearance issues with the stock oil pan. (I was told this would happen, but I still had to try.) I would really like to modify the aluminum one for the final product, but I am currently trying to locate a metal one from a 10v I5 to determine how it will need to be modded. If anyone can help me out with that drop me a line. Measuring from the pilot bushing to torque tube mounting surface on both engines shows them to be within 1\16th of an inch. I'm not sure but I think that will be close enough. Other than that I didn't get anything else done worth noting.
Monday, November 2, 2009
944 powertrain is removed
Well I didn't intend to pull the tranny out at first, but this was one of those live and learn things. The motor basically has to be lifted straight up to be removed from the car. This means you have to move the torque tube rearward, which entails that the transmission must be removed. The clutch fork pivot pin and I duked it out for a while. I don't think that it had ever been removed before. Long story short I got it all pulled out in a day. Now for some clean up work and I'll start looking at part fitment. I'll have a business trip this week so I won't be able to get anything done with the project.
Saturday, October 17, 2009
The future has arrived
This morning I pulled the motor from the S6. I took everything not likely to be used for the project and the accessories off of the motor and then gave it a cleaning with the power washer. It doesn't look to be in bad shape. I don't think that the timing belt has been done in quite some time. The rubber portions of the motor mounts literally fell apart. I think a good front end collision would have sent the motor sailing out of the car.
The project has begun.
Wednesday, October 14, 2009
New kid
I thought that I would show you the new member of the family. It is just a crappy little video taken with a cell phone, but it'll show you enough. We picked up a z06 Corvette for my wife to enjoy and use for autox. I like it, it's comfortable, really fast, seems to handle well, and is nice and flashy. This one has the red and black interior.
Here is another vintage commercial that relates directly with her car.
Now I know that your going to say that the 0-60 time in that ad just isn't going to cut it against the z06 and that is just one more reason for this engine swap to be done post haste. I hope that 425 bhp will be enough to best the z06. Time will tell.
Monday, October 12, 2009
Debating....
I had a pretty good performance at the event that I figured would be the last for the year, but I may be in contention for a trophied position. If that is the case then I will put off the start of the swap project until after the last official event is over at the end of October. If I am out of the running then I will go ahead and start the swap. Now I'm just waiting to see how the points pan out from the last event.
Friday, October 9, 2009
Starting weight
I didn't really think it was this heavy, but the scales revealed 2,750 lbs. That is with a half tank of gas and the a/c system already deleted. Now we will have a basis for comparison after it is all said and done.
Wednesday, September 30, 2009
Just about time
My barn project will finally wrap up this weekend! I'll also do a timing belt job on our 2003 Golf TDI. She finally rolled 200,000 miles last month. That is such a great car, I would recommend it to anyone. It still gets 48 mpg and runs like a sewing machine, even if it sounds like one to. LOL. We added an engine hoist to the tool cabinet last weekend. I have to go buy another engine stand since the Porche engine will need a home until I find a buyer for it. Oh, Saturday I am going to take the 944 to get weighed. I figured that it would be nice to have before and after weights, since I know that someone will ask. Until then though my wife has found some nice vintage commercials that I remembered from back in the 80's so I'll pop one up here now and then. I liked this one alot.
One more for the Audi side of this project....hehe. You'll see what I mean.
One more for the Audi side of this project....hehe. You'll see what I mean.
Tuesday, September 15, 2009
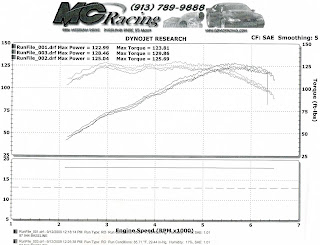
Baseline Dyno Run
Last Saturday we took Nina to MC Racing to get baseline readings to know what I have been working with this season. Also I figure that anyone who might be interested in buying the motor after it is removed might feel better if they had the information. By the way if anyone is going to need a 2.5 that runs well let me know. Then I can buy more parts for the 2.2. If you've seen a dyno pull on tv then you've really been there, done that. Except when it is your car. It gets more interesting then, even a little exciting. So on the final run Nina pulled 128.46 hp at the wheels. Online sources indicate that the car had roughly 150bhp originally. Using a standard 15% correction for drivetrain loss brings us up to 151.13bhp. Pretty much right where it should be. Truthfully I didn't expect that at all. I mean that is pretty sweet that a 22 year old motor is still making full power. Below is a scan of the dyno sheet.

Tuesday, September 8, 2009
Brief Update
I'm currently out of town on a business trip. I kept busy over the last weekend working on project number two. It is the last of the construction on our shop building. I have vowed to get this done before I start any new projects, including going any further on the engine conversion. Luckily I made alot of progress and hopefully will be done with another weekend's work. If I make that goal I am still way ahead of the projected start date at the end of October. I made alot of headway on the wiring harness. I have selected all the wires that I will use in the swap. However until it is actually running I will not be cutting out any of the wires. All that really means is that after I have the car running I will have to remove the harness again, clean, customize, and then reinstall. That might seem like a pain, but I won't ever be happy with it if I know that I half-assed a part somewhere. Well until next time. I'll try not to take so long.
Thursday, August 27, 2009
The calvary is here!
I've been doing a lot of poking around on different Audi sites for information on the various swaps that these guys are doing. Many are putting the 20vt into older cars and dealing with wiring issues similar to mine. During my travels I have run across Mr. Paul Nugent who happens to host s2central.net and also created s2forum.com. He has agreed to help with the wiring concerns that I have and all should be sorted in short order. If I can develop a pdf file half as good as his, the wiring in this project will become a cake walk for anyone who follows the path I'm beating down. You should check out his sites. They are loaded with information and knowledgeable people to chat with.
Monday, August 24, 2009
Brief note
I am almost done with a spread sheet that will detail the electrical requirements of the engine. Stay tuned and I'll post it here first.
Wednesday, August 19, 2009
Wiring
Well I have had the wiring stretched out in the living room since last week. I'm sure the mess and the beeping of the multimeter are about to kill my wife. Looks like the harness is in really good shape. Everything checks out okay with no damage to any of the connectors. I've traced all of the ECU pins to their destinations and marked everything. If I'm looking at it right there are only a couple of wires that will require power, and a couple of grounds. The harness is pretty specific to just engine functions. I do have a couple of wires that I need to verify their function before I remove them. Also I want to keep the Vag-com port intact and functional, so I will have to figure that out before I post the final procedure on this part. Here is a picture of the harness laying on the floor.

Monday, August 17, 2009
Nothing much
I worked on the S6 this weekend. The engine is ready to come out save for the motor mounts. I have the wiring harness removed and labeled. I need to find info on what the engine requires to operate so I can remove the rest of the circuits. Other than that I don't have alot to report.
Friday, August 7, 2009
Bell housing trial fit
There has been some concern about whether or not my adapter plate is actually the correct one, so I took it and the bell housing out to the s6 for a little tinkering. Now keep in mind that this is not a confirmed "yes it works" post, but it looks really promising! First I tried to just slide the bell housing over the clutch and onto the motor. It didn't work. I had been told that it wouldn't but I just had to try, it's in my nature. It seemed to be hitting the starter gear teeth. I couldn't tell for sure laying under the car with a flashlight. Next I placed the adapter plate onto the engine and it cleared the ring gear with no problems. Putting the bell housing onto the adapter plate also seemed to clear with no problems. Woohoo! Just keep in mind that I was juggling two parts and a flashlight on my back before I left for work so I don't know if bolt holes were lining up, but it made me feel better.
Fuel pump solution
Finally I have come to a decision in this area. I know that somebody will say that this is overkill for this project, but I will have room to grow. After a lot of digging around on different sites and reading a lot of flow information I came up with the following. Keep in mind that as pressure rises in a fuel system that the flow rate of your pump will decrease. The inverse is also true. To make matters worse there is no standard that manufacturers use to test their pump output.
The stock Bosch replacement pump for a 944 is p/n 0 580 464 069. It is rated for 98 L/hr @ 4 bar.
The stock Bosch replacement pump for the S6 is p/n 0 580 31 068. It is rated for 120 L/hr @ 3 bar.
With the difference in tested pressure I would assume that these pumps are about equal in flow at the same pressure. That would be for a stock application.
Since my 944's pump is of an unknown age and I hope to eventually be at a level of about 400bhp I decided to err on the side of caution and replace it with Bosch p/n 0 580 254 044. This unit is rated for 200 L/hr @ 5 bar or approximately 270 L/hr @ 3 bar. It's currently very popular in cars making at least 500 bhp so I have every confidence that it will supply enough fuel for my needs. It is also almost a direct fit for the 944 application. Just for your information there are several other Bosch units that fall in between the 069 and 044 models, but to tell you the truth I got tired of trying to figure out how small is too small.
Side note: As far as just using the s6 pump on the 944 until I start raising power levels...well you can't. The s6 is in tank and the 944 is in line.
Another note: After writing this info I have continued to receive information from different people. They have informed me that there are a lot of people with modded 951's making 400-500hp that are using the stock pump. That may be true, but it makes me uneasy. That being the case I may rethink my decision on using the 044 and try to find out the part number for the Bosch HV pump. It has upgraded performance over the stock pump, but not as much as the 044. I could live with that.
There are three main reasons to not go too big when selecting a fuel pump.
1: A larger pump requires more power to operate. This is going to take hp to produce, plus your wiring may not be up to the task of the increased current requirements.
2: Something I was not aware of until researching this topic, but it makes sense. If you circulate way more fuel than you need it will begin to actually act like a cooling system and transfer heat from your engine bay into your fuel tank. That is not a good thing.
3: Oh and this one is important to everyone. A larger pump costs more.
Final thoughts:
Alright the mystery is solved. I'm now going to choose a different pump. This is the mysterious Bosch HV pump. I located someone who read the numbers off the box for me so that I could look up the flow rate and current draw. Supposedly it is good for 450 rwhp sustained. That certainly will supply what I need without getting overly large. Here is the number break down on the three models for this car.
0 580 464 069 - 98 L/hr @ 4 bars - max 7 amp draw - stock replacement
0 580 254 910 - 130L/hr @ 5 bars - max 10 amp draw - this is the HV
0 580 254 044 - 200L/hr @ 5 bars - max 15.5 amp draw - this is the 044
On to the next problem.
Monday, August 3, 2009
Monday morning
Well I haven't done a single thing to the swap project over the last weekend, but I did get one of the home improvement projects done. One more to go and I can get started on the swap. I got a hold of an Audi service manual late last week. It looks to cover just about the whole car, so I hope it will allow me to make sense out of the wiring harness. I also picked up an HD camcorder to use for documentation of the swap. Hopefully in the next couple of weeks we will be able to get Nina to a dyno that is here in town and find out what she is good for in the stock configuration. I figure that will be a fun comparison to the finished project. I also found that Sokol (the Ukrainian guy with 20vt swapped 924) is using a walbro 255 liters/hr fuel pump in his car. I'll compare that to the S6 pumps flow rates to see how it stacks up.
Monday, July 27, 2009
Throwout Bearings
After some research on this topic I was able to get a couple of preliminary options sorted out. First I was talking with the gentleman from Russia who indicated that his car is operating with the bearing from an Opel Vectra C. I have also found that Tilton makes drive line components and several of its products look like they may be the ticket for this project. Their bearings are also adjustable for custom applications. I'm hoping that they might have a unit that will bolt up to the original guide tubes mounting holes. I can only guess that they will cost more than an OEM part and I still need to take things apart to find one that will actually work. I will post p/n's when they become available.
Audi LSD
It is true that you can use the LSD unit from the rear end of the Audi V8Q. This is a torsen type LSD. You will need the LSD and drive shaft flanges from the V8Q. There is also a little machining that needs to be performed on one side of the diff and the flanges have to be redrilled for the Porsche bolt pattern. Supposedly it works well if you want to use this type of diff. Reports are out there that these units are going for around 100 bucks which means that are practically free. If I didn't have my heart set on a clutch type diff I would give this one a try. Here's a link to get you some more info if you need it.
http://www.924board.org/viewtopic.php?t=23820
http://www.924board.org/viewtopic.php?t=23820
Tuesday, July 21, 2009
I am in a research phase right now since I have several projects around the house that need to be completed before I get to carried away with the engine swap. I have just heard that there may be a suitable Audi LSD unit that could be used in the 944 transaxle. Also I am searching for information on a hydraulic throwout bearing that could be used for this application among a lot of other things. If you care to make any comments on the blog or want to post info, you will find a comment button at the bottom of every post. You can use that to post replies here.
Following the site
Okay I'm not totally sure about this everyone, but I think that by following the site you will get notified when I make changes. Surely you don't want to miss anything. If your interested in this option just use the link in the minions section on the side bar. Should be pretty easy.
Sunday, July 19, 2009
K24 Turbo
The car I bought came with an extra K24 Turbo. Either one will need rebuilding if the cores are good. I haven't taken them apart for inspection yet, but I'm debating on whether I should replace them with a different unit from the get go. Low rpm boost will be very important to me, but the car will run to red line all the time also. I think this topic will take a lot of research. I'm wondering how many hp the stock turbo is good for and what its spool characteristics are. I've got a couple of places to ask, but if anyone has been down this road, drop me a line. I will post the information that I come up with.
Saturday, July 18, 2009
944 running with 7A installed
I'm pretty sure that this is a video of Bullmoose running his car up. Sure looks like it anyways.
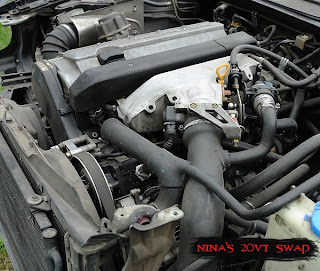
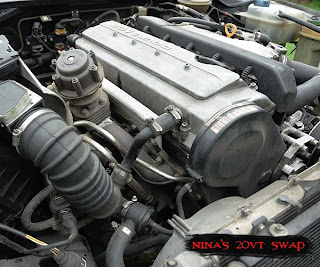
Audi I5 20v Turbo
Here's an important item that you will need also. An engine! We are sourcing ours from a less fortunate Audi S6. I believe that it is a 1996 vintage, but the year that you pick really depends on your personal preference. I hear that any of the I5 motors would work in this swap, it is just a matter of how you want the motor to be equipped. I personally was looking for an S4 or S6 built between 1992-1997. You'll find that S4's were built until about 1994 and then renamed S6. In the 1997-1998 time frame a different engine started being used. Before the S4/S6 series there was a Audi 200 20vt that was made in 1990 and 1991, I think. So if my dates are wrong shoot me a message and I will correct them. In this configuration there seems to be a distributor and a different intake manifold. Older than these are Audi 10vt cars which are also usable.
The reason that I chose the model I did was because it has no distributor and the intake manifold begins on the driver's side of the engine. The Audi 200 20vt has a distributor and the intake manifold begins on the passenger side of the engine. Obviously the S4/S6 power plant is a closer match to how your 944 is configured right now. I'm making the assumption that this will make all of the intercooler plumbing easier to install.
The reason that I chose the model I did was because it has no distributor and the intake manifold begins on the driver's side of the engine. The Audi 200 20vt has a distributor and the intake manifold begins on the passenger side of the engine. Obviously the S4/S6 power plant is a closer match to how your 944 is configured right now. I'm making the assumption that this will make all of the intercooler plumbing easier to install.


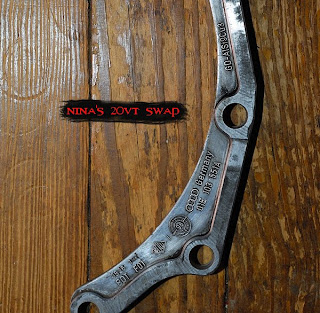
Audi 2.7 TT Filler Plate
The next piece that you will need is called a filler plate. It's found on the Audi 2.7 TT equipped cars. So far this has been the hardest part for me to locate due to the fact that noone knew what I was talking about and I didn't have a picture. Bullmoose did a good job of describing it to me and luckily had a p/n to. The part number for the piece he used is 01E103551C. A dealer ship looked it up for me and said it was superceded by the number 01E103551A. The second number is the one that I located here in the states. The dealer also thought that part was applicable to both manual and auto cars. I hope so because mine is from an automatic car and Bullmoose's was from a manual car. The future will let us all know if both parts are correct. There are also several thicknesses of this peice available. You want the one that is about 11.2mm thick. I don't know the part numbers of the thinner peices. Here are a couple of pics to help you guys find the right parts.


Thursday, July 16, 2009
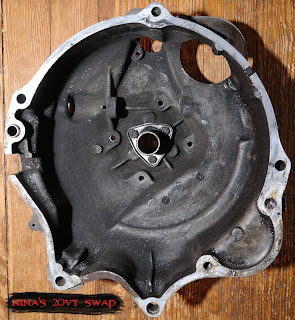
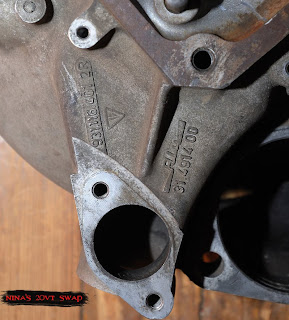
Bell housing
Okay in my searches around the net and through conversations with Bullmoose I have found that the 924 has a bellhousing that is suitable for this swap. There are two to choose from actually. A 924 bellhousing is equiped with a cable clutch and will work, but there is no provision for a slave cylinder, which we all know that the 944 has. I opted for the 931 bellhousing that came with the hydraulic clutch. It didn't take much searching to find one although I was warned that they were rare. Maybe I got lucky and if so I hope that it continues. Here are some pics to help out with the id of the proper part.

A word of warning here though, I haven't actually checked parts for fitment yet so buy at your own risk until I have time to make sure that it works.


A word of warning here though, I haven't actually checked parts for fitment yet so buy at your own risk until I have time to make sure that it works.
Another note is that the Porsche uses a pulling motion compared to the Audi's pushing motion. Bullmoose solved the problem with a custom clutch fork. He did mention though that using a hydraulic throwout bearing may be a better option. We'll see when we get to that point in the build.
I'm told that some clearancing will be required inside of the bellhousing to make it fit properly. Time will tell and I'll put it all in here.
Swedish Dyno Video
I had forgotten about this one.
Mapping Nira I3 - video from Maxtuning.se
It comes from sweden and it looks like they are doing a good job on this one. You can dig around in the website and get some info, but the translators that I have been using aren't that great. If this doesn't inspire you then, just move along. LOL
Mapping Nira I3 - video from Maxtuning.se
It comes from sweden and it looks like they are doing a good job on this one. You can dig around in the website and get some info, but the translators that I have been using aren't that great. If this doesn't inspire you then, just move along. LOL
Websites
I'll list some websites that I have been digging through looking for info. If your reading this you will probably be familiar with at least some of these.
Porsche sites
http://www.hybrid9s.com/
http://rennlist.com/
http://www.924board.org/index.php
http://forums.pelicanparts.com/forumdisplay.php?s=&forumid=10
Audi sites
http://forums.fourtitude.com/
http://audiforums.com/forum/
http://www.motorgeek.com/index.php?page=2
http://www.audi20v.net/home/
http://www.s2forum.com/forum/forumdisplay.php?f=2
There are alot more in my bookmarks, but these are the ones that I go to first, they get alot of traffic and each one a large archive of posts. Those should keep you reading for a long time.....
Starting out
Okay so I know this blog was built for a certain purpose so lets get on with it. I began researching this project about two months ago and all I can say is that there isn't much info on it. Let me rephrase that, if there is alot of info on it somewhere I hope someone will let me know. I did find one guy in the Netherlands who has gotten a 7A engine into his 944. He goes by the name of Bullmoose on some of the forums that are out there. He also has a site up that shows some very nice photos of his work. You can find it here http://www.944-20v.nl/ . I've been talking with him for a while and gotten alot of my info from him. Thanks for the help Bullmoose!
There is also a guy in Russia who has gotten the AAN into a 924. Here you can see a video that shows his car running. I haven't been able to find out anymore about this conversion.
So as you can see the pickings are pretty slim. I keep hearing that it has been done before, but now on knows by who so I have to assume that when mine is complete it will be the first in the US.
Wednesday, July 15, 2009
Catching up
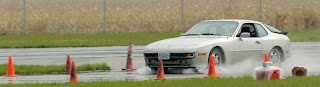
So to bring everyone up to speed it is mid July and I have been to 6 events so far. The car does very well competing in the CSP class. I believe that we are fourth overall at the moment and the people beating us are on r comps. We started out running 15" phone dials with Direzza Star pec tires. I really like those tires, but they are only available in 195's for that rim size. I just didn't feel that there was enough rubber under it so I searched for some new rims. Being in the Kansas City area we have a nice site called http://www.kcws.org/ there you'll find alot of 944 guys. Check it out, they are very helpful. Eventually a set of 993 cup II's came up for sale, which I purchased. They came with Sport Contact 2 tires, 205's front and 255's rear. I ran them for one weekend and didn't care for how the car turned. It was pushing alot. I was able to dial most out with the rear bar, but I opted for new 235 Ecsta XS tires in the front. Although I haven't run them yet I can tell from street driving that I have alot more grip up front. Rear bar adjustments are going to be mandatory at the next event. Besides that the car has had alot of other mods now, a/c delete, short shifter, AFM refurb, water pump, belts, hoses, ps pump, steering rack, the list goes on and on. You will find with one of these cars that most previous owners just put gas in them and after 20 odd years of use they need some attention. Shortly I will begin the info on the swap, but I wanted to lay some ground work and figure out how this blogging stuff works. I'll leave you with a more recent pic that shows the new rims on the car. If anyone happens to have a good condition front valence panel that they would like to see Nina wearing, drop me a line.

Tuesday, July 14, 2009
Background
Well you have to start somewhere.....

We took delivery of Nina on the 27th of July 2008. I can tell you I've always wanted one of these cars since I drove my aunt's 1986 turbo way back in 1987. In 1995 she offered the 951 to me, but I didn't think I could afford the parts to keep it running and passed on it. I have often regretted that decision, but you know how it goes. In early 2008 I found out that my brother-in-law had bought a 944. After seeing it once I told him, "If you ever decide to sell it you let me know." A couple of months later we had worked out a deal and picked her up. Driving home I was having visions of racing this car somehow to satisfy one of my boyhood dreams. Here is a picture tucked away in the garage that first night.
Anyone who knows me can attest to the fact that I am pretty anal about my machines. I'll go get them, but noone gets to use it until I have checked it out completely. In this case it probably saved the car and someone's life. While checking wheel bearings and brakes I noticed the passenger side ball joint was about to fall off. I made a note of that and moved to the rear of the car. I found both rear axles were missing bolts and the tranny was howling like a cat in heat so I made a couple of decisions. We had to overhaul the entire car's suspension and we were going to start racing in Solo. Parts began rolling in, money was rolling out and I trudged on putting everything together. Nina was getting pretty grand treatment: full delrin bushings, Hyper coil Koni coil overs up front, larger t-bars in the rear, new axles, bearings at every corner, new a-arm and ball joints, new pads, rotors, and some 968 m030 sway bars. I know there was alot more, but I cann't remember and your getting bored. I finished it up one week before the Kansas City SCCA's Solo test-n-tune event.
So here is a little picture that my wife took that first rainy day, what a blast!

Subscribe to:
Comments (Atom)