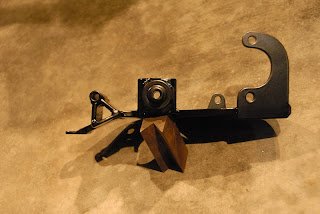
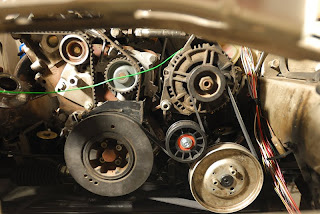
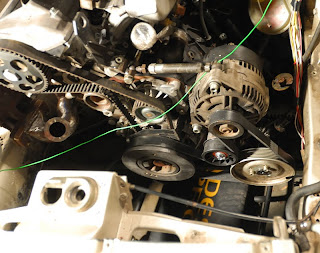
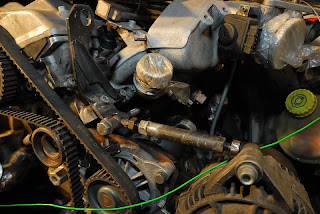
Okay so I got the adapter back and have fitted it to the bellhousing, so lets check it out.
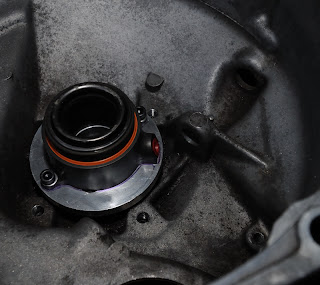
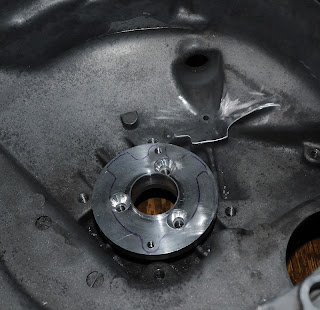
Below you can see the assembly bolted in place. I'm going to route the supply line through the hole that the 931 clutch fork came through, so the bearing journal is going to be in the way.
A die grinder made short work of that job and now there should be plenty of room for the hose with a 45 degree end on it to attach to the bearing.
Adapter is back in place minus the bolts. I used a marker to show that the bolts that hold this in place will be under the bearing, so I used counter sunk 8mm cap screws. The OEM bolts here are 7mm, but I couldn't find any counter sunk cap screws in that size.
Finally here is the bearing back on top, there should be plenty of room for the hose now. Be sure to blend out the marks from the die grinder. Aside from possibly cutting the hose they could give a crack a place to start.
Friday, December 31, 2010
Wednesday, December 29, 2010
Things on the horizon
I have been over and over what I should do about instrumentation. I like how easy it is to read analog gauges and have to say that I like how they look also. However I think that going digital just makes more sense. There are many different digital systems to choose from. You can spend weeks looking into this subject, I know I have. So I promised myself that I would just go with the Race Technologies Dash2 and DL1 data logger. One of the main factors for choosing this one is that it can read info from the VEMS and log it. Most of the others won't. Along with this will be a fiberglass replacement dash probably from Broadfoot racing, also a rollbar setup that can become a full cage if need be. Most likely I will go with the unit from Hanksvillehotrods. It welds in with lots of different options. I still need two OEM cup II rims that are 9 inches wide and probably a set of Sparco harnesses.
Final clutch parts
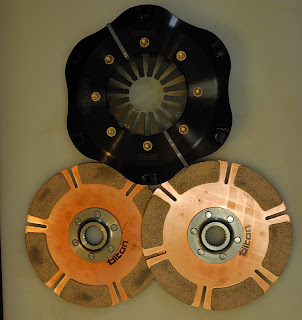
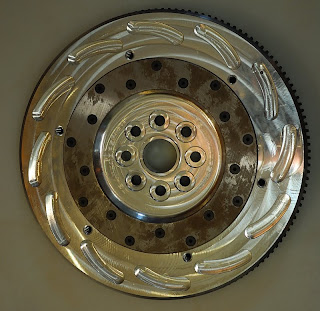
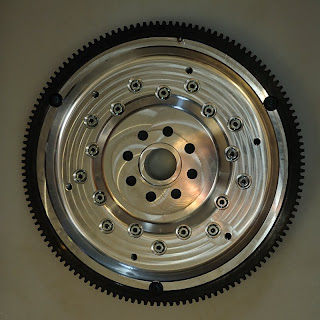
Hopefully the last of the clutch parts will be done tomorrow. I feel like this portion of the build is holding up the whole of everything else. I have pretty much totally replaced the whole clutch system with Tilton products. Probably about 1300 usd not counting the flywheel. Painful for the pocket book, but hopefully it removes the growing pains. The clutch is a twin disk unit, I went with the 61-802 throwout bearing, and will order the 75-750u master cylinder after I measure what length hydro lines that I need. The part that I am waiting on is the adapter plate to mount the throwout bearing into the bellhousing. The machinist is also truing the turbo manifold and making some alignment pins for me.
Now you don't have to have all the parts that I have used. I'm sure that the original master cylinder would work with the right fittings. The threads in the end of it are m12 x 1.00 FYI. Your stuck with switching to a hydro bearing although there are many to choose from, and there are a lot of clutch options out there if you are creative with mixing and matching. You could probably do it cheaply for about 3-400. My route will be more like 2k with the flywheel and all thrown in.
Now you don't have to have all the parts that I have used. I'm sure that the original master cylinder would work with the right fittings. The threads in the end of it are m12 x 1.00 FYI. Your stuck with switching to a hydro bearing although there are many to choose from, and there are a lot of clutch options out there if you are creative with mixing and matching. You could probably do it cheaply for about 3-400. My route will be more like 2k with the flywheel and all thrown in.
EFIExpress Chevy coil swap
I haven't even heard this motor run yet, hopefully it does. Anyway without knowing the service history of it I figured I would just replace the ignition system in an attempt to avoid some problems in the future. If your 944 isn't gutted like mine you will have to find another location for the coils than were I plan to place them. Just by laying the sparkplugs out it looks like they will reach this location fine. On first look I think I will run the supporting wiring to the VEMS through the grommet that the heating units low speed resistors got their power from. It's located above the battery just behind the vacuum reservoir. I'm waiting to get the motor back in before I move too much farther with this portion of the project. The big plate under the coils is covering the hole where the heating and a/c unit used to be.
Flywheel Sync Pin
When I ordered the 034 flywheel there was some concern over whether or not the pin that triggers the VR sensor would be in the correct place for use with the VEMS system. To me it sounds like the VEMS ecu requires the pin to be more precisely located than the stock ecu requires. The failure mode is basically a non start condition. The computer requires the Camsync and VR reference pin to both be seen at specific locations before the motor will start. Marc at EFIExpress educated me on how to check if your pin will be close enough, so I'll pass this on to you guys. This is simple enough if I understood it correctly.
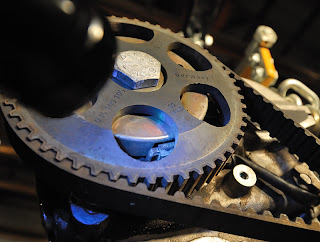
Below you are looking at the camsync hall sensor (the flashlight is shining on it). It's easy to find, just follow the wiring. We are concerned with the dark area behind it, which is a cutout in the perimeter of the disk behind the cam sprocket.
Below you are looking at the camsync hall sensor (the flashlight is shining on it). It's easy to find, just follow the wiring. We are concerned with the dark area behind it, which is a cutout in the perimeter of the disk behind the cam sprocket.
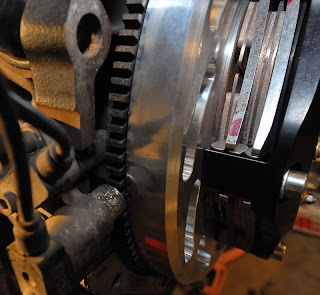
Below you are looking at the left most sensor (it is pointed between the flywheel and block, not at the starter teeth). This sensor is the one that the pin will pass by. Roll your motor over clockwise like it was running. When the pin is centered on the VR sensor go to the front and check the placement of the window behind the camsync sensor. If your sensor is in the window your golden, if its about 180 degrees off give the motor another full revolution and recheck, if its not 180 degrees out but not in the window either then your pin is in the wrong location (you'll have to correct this before the motor will start).
Wednesday, November 24, 2010
Bell housing
I am working with the bell housing now. The spacer plate and bell housing have been welded together. There are a couple of areas that I'm reinforcing by adding material. The area that the starter goes through will get a cover made for it. I still have to cut away a portion of the spacer plate to allow for the rpm and position sensors to pass through. There is also the original 931 starter boss that needs a cover made.
The steel coolant line that runs the length of the drivers side of the block has been modified to remove the provisions for the turbo cooling pump. The aluminum water manifold just under the intake manifold still has to be dealt with as it has two passages for the turbo pump that need to be blocked. Looks like I will just weld them closed also.
The oilpan is resealed and torqued down. I've got a new timing set to install, make an adapter for the hydraulic through out bearing and I think the motor can probably go back in. We'll see what else crops up that needs attention.
Friday, October 29, 2010
Its getting colder again
I don't care for cold weather much and its headed this way again. That also means that we have passed the one year mark since the motor was pulled. I was hoping to have it done before now, but oh well. I turned on the lights over the week end and everything on the rear of the car was working. The front still has everything removed for now. Hopefully the wiring is pretty much done chassis wise. The motor is coming back out this weekend hopefully for the last time before we try to start it. While that is out I'm having the turbo overhauled, installing the clutch parts, pulling the head (to have a peak at the cylinder conditions), and some general house keeping.
Monday, October 11, 2010
Interior shot
WTH, my interior fell out. Well I bit the bullet and decided the best way to make it faster is to loose some weight so she's going on a diet. There won't be much left when I'm done. Right now I am neck deep in the wiring. Hope this works out, LOL.
Thursday, September 16, 2010
Progress picture
Here is a picture as it stands tonight. I have to finish up the IAC plumbing, but you couldn't see that in this picture anyway.
Monday, September 13, 2010
Oil Cooler
Okay last weekend I got the brackets for the oil cooler made and welded into the car, the hoses are made and the whole mess is installed. That took a while. I spent a lot of time just staring at it until I settled on the final spot for all the parts. I'll put a pic up shortly. I cut the end of the turbo housing off and welled in a bit of a bend so that it is angled towards the intercooler properly. There is a 7a thermostat housing on the way so I can fabricate the neck that I need. The AAN neck is plastic, where the 7a is aluminum. So keep that in mind if you will need to change this part. Maybe if I'm lucky all of the stock radiator hoses from the 944 will hook right up to this motor. I also started on the bracket to locate the IAC valve, but my allergies got so bad I had to go lay down. That sucked and tomorrow I head out of town for work. Oh and there is only one hose left to make and the fuel system will be finished. I will have to post those pics also. Lots has been getting done, except for posting on the blog.
New Seats
I ran across a good deal on some brand new Sparco Evo seats that were being sold on Craigslist. We actually took them out of the bubble wrap for the first time so I could check them out. The seller has a nice BMW track car that I got to check out while we were talking. Thanks again if your reading this! Now I'll just have to pick up some brackets.
Power Steering Ressy
There is a nice place to put the res for the power steering on the drivers side of the engine bay. That places it above the pump and behind the swaybar bushings, so hopefully my days of bad bushings are numbered. I carefully removed the mount from the passenger side wheel well, cut some parts off of it, added some new parts, and now it bolts to two unused holes that already existed in the drivers side shock tower.
Sunday, August 29, 2010
Throttle body relocator
I'm sure that I mentioned at some point in the past that I would have to do something about the brake master cylinder hitting the throttle body. I have debated on many different ways of doing this, but went with one of the simplest ways that I had come up with. I simply made a new section of tubing to move the throttle body more to the center of the car. It also aligns it with the intercooler so that I only have to use a short straight piece to connect the two of them. And this was the first true test of the TIG unit to see if it was really working. I had to open up the power output selector and manually move the contactors into the AC position, but after I did that it worked great. The weak link was me, like usual. I took a few practice welds on some scrap and then just went for it. Since that worked, I will be able to reinstall the original braking components for now and leave that upgrade until later. Here is the pic of the new tubing.
Its not polished or anything yet, but functionally done. The brake parts that are visible are from the s6, so just ignore them. As an unexpected bonus I think that the position is now correct to use the stock 944 throttle cable...maybe. I also got a couple more oil lines made, picked the location for the oil cooler, mounted and plumbed the oil filter relocator, changed some belts in my mom's car, and replaced the gears in the Corvette's headlight motors. Its been a busy weekend, but next week has a three day long one!
Its not polished or anything yet, but functionally done. The brake parts that are visible are from the s6, so just ignore them. As an unexpected bonus I think that the position is now correct to use the stock 944 throttle cable...maybe. I also got a couple more oil lines made, picked the location for the oil cooler, mounted and plumbed the oil filter relocator, changed some belts in my mom's car, and replaced the gears in the Corvette's headlight motors. Its been a busy weekend, but next week has a three day long one!
Saturday, August 28, 2010
Clutch Arrived!
I finally got the clutch in. It sure looks nice. All this time we had been waiting on Tilton to make the disks. I ordered all of these parts through Marc at EFI Express. He has been a lot of help and I'm sure he will be glad when I get this done so I'll leave him alone. Here are a couple of pictures of the clutch though.
I'm heading to the garage to get started again.
I'm heading to the garage to get started again.
Thursday, August 12, 2010
Intake hoses
Here is a pic of some silicon hoses that I ordered online. They look like quality parts, I just wish the colors of the two pieces matched each other better. Kind of disappointing. Oh well they should work fine. I'm pretty sure that I have repaired the TIG welder. The last of the new parts should be in tomorrow and I'll give it a shot on some steel this weekend. Monday my Argon bottle should show up and in about a week I should have the aluminum elbow in for the throttle body relocator. Moving that a bit should allow me to retain the stock brake setup.
Monday, August 9, 2010
Mondays
I worked on the car yesterday for a bit. I'd been working on the TIG welder trying to figure out why it doesn't work. I found a dead contactor for the main transformer. Hopefully I can still get parts for this old thing.
The VEMS is so small that it easily fits where the stock ECU was (in the passenger floor board). I was surprised to see that they didn't put any kind of mounting points onto the casing. However it is easy to mount the VEMS by cutting a slot into the factory mount and using a large band clamp to secure it into position.
I also cut out the end plates for the throttle body relocator. I expect the tubing to arrive next week so I will have to get that welder running.
Tuesday, August 3, 2010
Still here
Sorry I haven't updated in a bit. It's been hectic here. Work has me out of town during the week and we've been racing the Corvette during the weekends. As a side note I won the ASP class at our divisional event against a Nissan GTR. I didn't know if I could pull that off or not. Last weekend, at a local event, I finally beat a guy that I have been chasing for a long time. It was a very tight race with 503 thousands of a second separating us at the end of it. I don't think I will be as lucky next time so some extra effort will be in order.
Okay so the state of the car is disassembled. Now that is nothing new! I made the turbo return line. The braided stainless looks nice. Actually they are very easy to assemble. I was into making the turbo feed line when I discovered that there isn't room for the fittings that I bought, putting a 90 degree elbow in there should solve the problem. I dismantled the Audi harness into all of its individual parts and cleaned it all up. I'm pretty sure that the intake plumbing is sorted and its parts are to be on order shortly and we're waiting for another round of hose parts to arrive at MC Racing for pickup. I moved an old TIG welder that I have to the project side of the shop, hopefully it functions because I've never hooked it up even though I've had it about 5 years. I don't like the idea of having to find a different one or farm out the TIG work, after all this is a learning experience also.
Okay so the state of the car is disassembled. Now that is nothing new! I made the turbo return line. The braided stainless looks nice. Actually they are very easy to assemble. I was into making the turbo feed line when I discovered that there isn't room for the fittings that I bought, putting a 90 degree elbow in there should solve the problem. I dismantled the Audi harness into all of its individual parts and cleaned it all up. I'm pretty sure that the intake plumbing is sorted and its parts are to be on order shortly and we're waiting for another round of hose parts to arrive at MC Racing for pickup. I moved an old TIG welder that I have to the project side of the shop, hopefully it functions because I've never hooked it up even though I've had it about 5 years. I don't like the idea of having to find a different one or farm out the TIG work, after all this is a learning experience also.
Thursday, July 22, 2010
Not cool
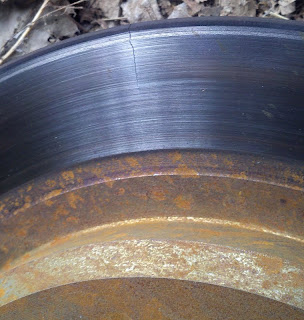
Well I have a mid divisional event this weekend that we'll run the Corvette in so I decided to put fresh tires on her. While the passenger side rear was off I found this.
We replaced all of the rotors within the last month when we switched it to Hawk HP+ brake pads. Luckily I had kept the old ones to be safe....really I just hadn't taken them to the trash yet. So I would give Wagner Corvette rotors a big thumbs down. On the other hand though I would give the Hawk brake pads a huge thumbs up! If you aren't wearing a seat belt when you press the brakes you'll be going through the windshield.
We replaced all of the rotors within the last month when we switched it to Hawk HP+ brake pads. Luckily I had kept the old ones to be safe....really I just hadn't taken them to the trash yet. So I would give Wagner Corvette rotors a big thumbs down. On the other hand though I would give the Hawk brake pads a huge thumbs up! If you aren't wearing a seat belt when you press the brakes you'll be going through the windshield.
Wednesday, July 21, 2010
Parts are arriving
Well most of the oil system parts list is here, but a couple are back ordered. Like a lot of other parts that I have chosen it seems like you have to be patient for them to show up. All of the clutch parts are still on hold thanks to a shortage of Tilton 944 rally pack disks. The VEMS is here and I have started to go through the wiring. Not to bad so far, but I haven't gotten very far either. The EFIExpress fuel rail is in and looks to be pretty nice, I should go out and see if it fits.
Wednesday, July 14, 2010
Anniversary
I've been posting info to the site for a year now. Doesn't seem like that long to me, but I bet most of you want me to get this thing finished. My clutch plates from Tilton won't be back in stock for at least 3 weeks, so we will work on the wiring and finish up the fuel system as soon as the package from EFIExpress gets here.
Tuesday, July 6, 2010
Oil System Shopping List
Since some of you may be interested in the actual part numbers, here is the shopping list that I sent out to get quotes on. The blue items were ordered from 034Motorsports. The rest of them are being quoted. Hopefully there aren't any errors, but I won't be able to tell you until I assemble everything.
1. Turbo oil lines
a. Return line
i. T3 Turbo Drain Flange with -10AN / x2 / 034 motorsport / upper and lower ends use the garret t3 flange
ii. T3 T4 Oil Return Flange Gasket / x2 / 034 motorsport
iii. Fragola #104510BL / x1 / -10 45° HOSE ENDS-BENT TUBE
iv. Fragola #70010 (bulk/ft) / 19” / -10 Series 3000 SS Hose
v. Fragola #100110BL / x1 / -10 STRAIGHT HOSE END
b. Supply line
i. KKK Oil Inlet Flange Kit / x1 / 034 motorsport
ii. Fragola #497306BL / x1 / -4 Nut X -6 Male SWIVEL FLARE EXPANDER
iii. Fragola # 104506BL / x2 / -6 45° HOSE ENDS-BENT TUBE
iv. Fragola #703006 (bulk/ft) / 24” / -6 Series 3000 SS Hose
v. Fragola #491953BL / x1 / METRIC ADAPTER -6 12 X 1.5
vi. Fragola #999212 / x1 / 12mm crush washer
2. Remote oil filter
a. Permacool 1711 / x1 / Summitracing
b. Fragola #481610BL / x4 / -10 X 1/2” MPT STRAIGHT ADAPTER
c. Fragola #100110BL / x4 / -10 STRAIGHT HOSE END
d. Fragola #70010 (bulk/ft) / 30” / -10 Series 3000 SS Hose
3. Oil cooler
a. 21300AERL / x1 / Summitracing / 13 Row Oil Cooler -10 AN
b. Fragola #461018BL / x2 / METRIC ADAPTER -10 18 X 1.5
c. Fragola #999218 / x1 / 18mm crush washer
d. Aeromotive #15608 - / x2 / ORB 10 AN-10 Male Flare Fitting
e. Fragola #109010BL / x2 / -10 90° HOSE ENDS-BENT TUBE
f. Fragola #104510BL / x2 / -10 45° HOSE ENDS-BENT TUBE
g. Fragola #700010 (bulk/ft) / 64” / -10 Series 3000 SS Hose
More items completed
The whole exhaust is complete now from the front to the back. I sat down and figured out all the plumbing to complete the oil system, sent out some emails and I'm waiting for the quotes to come back. I had hoped that I could reuse the oil cooler from the S6, but I don't know what kind of fittings that it uses. So if anybody needs a good cooler and lines let me know. Anyway I have located a nice replacement that uses AN lines. The oil system changed a little from before, because it now retains the stock filter housing. I really wanted to keep the thermostatically controlled oil cooler part. Hooking up the cooling system shouldn't be too hard from my assessment. I'll have to make one pipe to move fluid from the lower port on the block to the lower port on the radiator. I have the stainless inbound for that task. There are some other problems in the cooling system to work out since the new turbo isn't water cooled, but they are nothing to write about for now. Pretty sure that all of the parts are inline for the power steering system. Hopefully removing the restrictor in the brake stage of the p/s pump will allow it to circulate without aerating the fluid. We'll just have to try and see on that one. It looks like the S6 power steering cooler will mount nicely into the front of the car after making a couple of new brackets and I believe that I can relocate the original Porsche p/s reservoir bracket to the drivers side shock tower to hold the original reservoir over the pump. The only real problem is the intake plumbing. It is doable a couple of ways I am just trying to make the final decision.
Friday, June 25, 2010
Great Vendor
I have gotten a lot of great parts, technical advise, and service from Marc Swanson at EFIExpress. Hopefully you'll remember him next time you need something. If you are building your own exhaust he is the only place I have found to get the headside exhaust flange made from normal steel and if it isn't on the website give him a call because he probably has it anyway.
Thursday, June 24, 2010
Next week
I know I haven't been posting a lot lately. Its gets really busy at the end of every quarter at work, but next week I will be on vacation with lots of parts at the house to install. I still have some exhaust work to do, but everything is here. On the way is the VEMS computer and multi-disk clutch assy. If I make it through all of that I can plumb the coolant system. So there should be some good times on the way.
Sunday, June 13, 2010
Accessory Bracket
I went and picked up the bracket this week and snapped a couple of pics for everyone. Hopefully with the pictures that are already up and these you can see how it all works.
This one is the side profile. If we start on the left side of the picture and move to the right we have the top mounting bolt, alternator boss, 2 mounting bolts, idler pulley support, and power steering bosses.
Here is what you would see from the front of the motor. The left most part curves to match the side of the block.
Well I'm going to go see what I can get done of the exhaust this morning.
Tuesday, June 1, 2010
Update
Sorry for the really brief update, but work is really keeping me busy for the moment. I finished the accessory bracket and it is at the powder coaters, pictures will follow. The VEMS computer and clutch assy are on order. I think you guys will like the clutch. It's going to be on the outer limit for a street car, but I want as much acceleration potential as possible. A new dash system will follow shortly. I think that most of the major systems are coming together now. I need to build the exhaust and work on the plumbing layout for the p/s system next. Later
Monday, May 17, 2010
Rainy autocross
The event on Sunday was in great weather. It was fun like always only this time I took my brother-in-law offroading in the Corvette. The people who saw it said we made a great splash. Check it out for yourself.
Accessory bracket
Well the accessory bracket is pretty much done. It holds the alternator and power steering pump nicely. I tried to keep the weight low in the car and put the pump at the bottom so it doesn't leak into the alternator. Hopefully the Audi one doesn't leak like the Porsche system does. I had a local guy machine a mounting boss for the idler pulley that you can see in the pictures and then welded it into the bracket. The power steering pump uses three bolts to hold it in like the original Audi mount used and the alternator uses a lower pivot and the adjuster from the Porsche engine. I had to shorten the adjuster 2.5 inches to make it usable. Just cut of the nut on one side, cut the tube down to size and weld the nut back on. The two rod ends needed about .5 inches removed from each end also. The engine side mount for the adjuster is welded to the bottom of the lifting eye that bolts to the cylinder head. I don't think I will have any problems with belt squeal, hopefully. Soon I will drop it by the powder coater and post pics of the bracket by itself.
Sunday, May 9, 2010
Saturdays progress
I added the alternator's pivot point to the bracket and decided that I will surely need to have an idler roller involved to minimize belt squeal. So after scrounging around in my local parts store I found a roller that looks suitable. I just finished drawing up some plans for a spacer bushing that I will need to get the pulley mounted. Hopefully I can get them dropped by a machine shop this week. I'm trying to keep things kind of modular so that if a part fails I can redesign without major work. Hopefully the first design is adequate. Yea right. LOL.
Sunday, May 2, 2010
Sundays effort
Well today I finished installing the new fuel pump. Hopefully the new foam sealing strip that I installed will keep some of the crud out of the pump's cavity. All said I was not the happiest with the fit of the 044 pump. Don't get me wrong, it will work fine, but you can tell that the space was designed for a different pump. So with that project down I moved back to the front of the car and made a bracket for the power steering pump. I'm using the pump and alternator from the Audi so that the belts will not be an issue. I've heard that the 7a motor has a v-belt setup so you could use the Porsche pump and alternator if you'd like, you just need to source the correct harmonic balancer. Hopefully there won't be any issues will pump output volumes or pressures, but if they crop up I'll let you know. It would be doable to fit the pulley from the Audi pump onto the Porsche pump with a little work. I have to get a steel tube to make the alternator bracket and then I will post some pictures like normal. I have both units mounted as low as possible on the drivers side. There was quite a bit of room in that area. My only concern now is routing of the lower radiator hose. Some sort of custom hard line may be in order.
Thursday, April 29, 2010
Fuel system parts
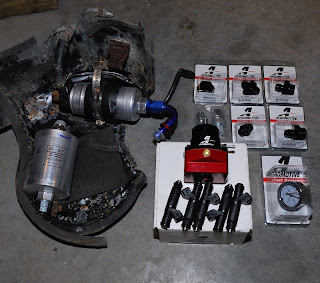
Here is a picture of most of the fuel system parts. You can see the 044 pump, new filter, deka 4 630cc injectors, aeromotive AFPR, and other associated parts. Not pictured is the fuel rail (still waiting for it to be made), tank filter (already installed), and some hoses and fittings (waiting on the rail so I get the right parts). You can see the AN 120 degree elbow on the end of the pump that adapts the pump to the tanks line size.
Sunday, April 25, 2010
More Relaxing
This was my fastest lap from last Saturday. I'm becoming a lot more comfortable in this car.
Fuel Tank
I pulled the fuel tank down yesterday to look for a leak. The car has always seemed to have a fuel smell inside. It ended up that at some point in the past a sub-woofer was mounted to the back deck with screws that went into the gas tank. When I got the car, I cleaned out everything that I didn't like, to include the sub mounts. I can remember that those screws were about 2 and a half inches long. So anyway I fixed the holes, checked all the lines and reinstalled the tank. I got a great deal on a 044 pump so I went with it instead of the HV pump that I discussed earlier. When taking the old pump off the hose clamp that connects the tank line to the pump just fell off. It was completely consumed by corrosion.... glad I found that! Now I am missing a piece of plumbing though, because the 044 doesn't have the same type of outlet port that the stock and HV pumps do. That's alright as I needed to order a new filter, new tank pick up, and compression fittings to convert the hard lines to AN lines up front. I'm still waiting for the new fuel rail to become available from EFI Express. That should be the last piece of the fuel system to acquire and then I can check that one off of the to-do list. Well I think that I will head back to the garage and find some more trouble to get into, maybe some wiring.
Tuesday, April 13, 2010
Relaxing on the weekend
We got one of the gopro hd camera's and I put it on the window of Jenn's car to see how it did autocrossing last weekend. I'm pretty happy with it, the camera and my run. Hopefully I processed it correctly so that it looks very nice on everyone's computer. Have a good one. Lots of fuel system parts are on the way!
Sunday, April 4, 2010
Exhaust manifold part 4
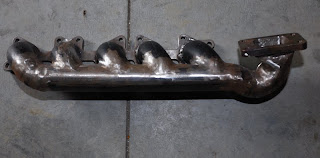
Still not completely finished, but I was checking the fit and figured I might as well snap a couple of pics. The first are just some of the manifold laying on the floor.
Here are a couple showing how it is fitting into the engine compartment. Looks like I will have plenty of hood clearance. Although I wonder if it will bake the paint off of the hood. I might add some heat shielding to counter that. I will definitely have to add some shielding to protect the timing belt. The hot side is really close to it.
Once I get done fiddling with the finish of it I will have to get the exhaust flange resurfaced to get rid of a little warping that occurred from welding it all up.
Thursday, April 1, 2010
Update.
Briefly, I wanted to update everyone that the manifold is virtually done. It is just some cosmetic stuff left because I want it to be pretty. LOL. Our Corvette has been giving me fits since last weekend so I have been focused on that so we can run it at an event this weekend. Nothing major is wrong, just an electrical gremlin in the steering column causing the fuel to cut out over 2mph. The parts are inbound, and I think I can get back to the manifold now. Hopefully everyone isn't too bored yet.
Tuesday, March 23, 2010
Exhaust manifold part 3
I'm still working on it, mostly just blending welds trying to get a seamless look. Just a lot of unnecessary work, but I don't want it to look like a turd when I'm finished either. I'll keep on top of the progress reports.
Sunday, March 14, 2010
Exhaust Manifold part2
Well I didn't get done, but I am so tired I can't see straight anymore. The only part left is the transition from the end of the manifold to the turbo flange. The wastegate and rest of the manifold is completed and fully welded. I think I'll pick up some metal this week for the transition piece and then it will just need to be cleaned up. There isn't much room for the holset, but they are huge compared to a stock turbo. Overall a manifold isn't hard to make. The hardest part is making the end of the round tubing fit the rectangular T3 flange.
Wednesday, March 10, 2010
Exhaust Manifold
I am making progress on the manifold. I decided to go with a log style do to the limited room available. It exits towards the front of the engine and will place the turbo at the right front corner of the car. Since the body of the turbo is so large I had to remove the power steering reservoir bracket as well as the one for the headlight motor. I guess that means I'm converting to fixed headlights. I don't mind really as I was pondering that move to get rid of more weight. I'm planning to use a full 3" exhaust from the turbo back and its looking like I will have the room. The exhaust will sort of travel over the manifold while the wastegate pipe travels under the manifold reconnecting just above the starter. All of the guestimations have been accurate so far. If the success holds out I may have the time to get the manifold all assembled by the weekend.
Wednesday, March 3, 2010
Picture contest is over
Thanks to everyone who voted! However we didn't win. Guess I will have to keep my day job...lol.
Saturday, February 27, 2010
Motor mounts are back
I picked up the motor mounts from the powder coater earlier this week. The one that appears to be shorter is for the passenger side. Like I said before the drivers side needs a spacer at the engine in order to use a flat plate. You could also contour the plate on the engine side to get rid of the spacer, but that makes attaching the tube for the cross member more difficult. Fitment on the passenger side is really close to the starter. I didn't actually try to pack it in this tight, but it will leave plenty of room for the 3" exhaust. Fitment on the drivers side is good also with plenty of room for the steering shaft.
To make these I made tracings of the original AAN mount by gluing card stock to them and cutting it with a ball peen hammer. The same way you would make a custom gasket. Then just move the patterns to some .250" plate steel and cut them out. I created the feet with some paper and a compass while watching television. Transfer the pattern to some .250" plate steel and cut them out. Next I mounted all the pieces and positioned the motor with an engine hoist. Using PVC pipe that was close to the size of my tubing I made some mock ups. Its really fast to work and cheap to start over if it doesn't work out. After that you just recreate them with your .120" chromoly tube and weld it all together. It doesn't take any special equipment other than a welder to do this, just some patience. Now I can drop the motor back in and start the exhaust manifold.
To make these I made tracings of the original AAN mount by gluing card stock to them and cutting it with a ball peen hammer. The same way you would make a custom gasket. Then just move the patterns to some .250" plate steel and cut them out. I created the feet with some paper and a compass while watching television. Transfer the pattern to some .250" plate steel and cut them out. Next I mounted all the pieces and positioned the motor with an engine hoist. Using PVC pipe that was close to the size of my tubing I made some mock ups. Its really fast to work and cheap to start over if it doesn't work out. After that you just recreate them with your .120" chromoly tube and weld it all together. It doesn't take any special equipment other than a welder to do this, just some patience. Now I can drop the motor back in and start the exhaust manifold.
Friday, February 26, 2010
Fund Raiser Alert!!!
Okay this may seem weird, but just to the right of this post at the top of the sidebar is a link to a photo contest that I entered. That great picture of Nina that you can see was taken by my wife Jenn. Top prize in the contest is 1000 dollars! That will buy a few more pieces for this project. So if you would, click the link and vote for us. BTW you can vote once a day until 5PM central US time on the 1st of March. Thanks!
Thursday, February 11, 2010
Oil Pan Finished
The oil pan is back from the powder coater. I have to say that I am pleased with the outcome. Hopefully my baffles will be adequate to combat starvation at high g loads. If need be I may add a Accusump system, but I will give it a go without one first. No sense in adding unnecessary parts. I sloped it slightly from front to back to aid in drain back. The bottom of the front portion is within .500" of the front cross member The bottom of the sump doesn't hang down more than .500" below the front cross member. The donor pan was from a 3b motor and the rest was fabbed from .070" sheet stock The bottom portion is made from 13 individual pieces of material. The whole pan was assembled and then welded inside and out. The outside was then ground down for a nicer finish. So check out the pics. I don't have measurements on this part. I just fabbed as I went along but basically tried to maximize the volume of the pan an ended up with a shape that resembles the Porsche unit. I guess those guys did their homework. Sump capacity is right at seven quarts, on par with the Porsche pan. If you add in the remote filter and cooler system I will probably be pushing 9 quart system capacity I would guess.
Saturday, January 30, 2010
Clutch problems
I have been researching clutch options lately. I really want to set the car up with a twin disk unit, but it looks like the flywheel will have to be custom machined. That equates to some serious dollars for a chunk of steel. It just baffles me that I can't find someone that makes a flywheel for this application. If I decide to go with the twin disk unit it will most likely be a Quarter Master 7.25" unit. On the other hand I could use a Fidanza aluminum flywheel and something like a Southbend clutch. If someone knows where to get a flywheel for the minidisk, please drop me a line. I know that there are plenty of lower budget alternatives to make it work, but I'm looking for a fast revving engine to get the turbo spooled up as quickly as possible. Sure I'm going to sacrifice some drive-ability with either setup, but this isn't a DD car either. I'll keep searching and post the results.
Tial parts arrive
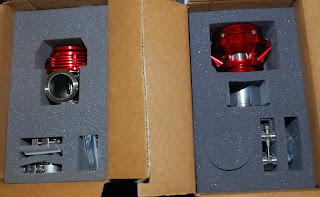
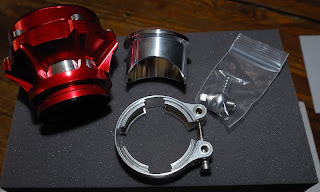
I wanted to show off the awesome parts that arrived this week courtesy of my new friend John O'Connell at the Turbo Center in St.Louis. Seems that they are a full service turbo shop located in my home state. They can rebuild, balance, and fab up parts for your turbo system. I wouldn't have known about them at all, but luckily when I called Tial looking for a distributor they gave me their phone number. If your looking for competitive pricing in the Midwest and great service give them a call at (314) 481-3778. I was really surprised by the packaging. I'm not sure what I expected, but I was impressed. The parts are really nice looking also, hopefully they perform just as well. BTW the wastegate is the newer Tial MV-S and the BOV is the Tial Q. Here are a few pics.
Now I need to return to the shop and finish the oil pan today.
Now I need to return to the shop and finish the oil pan today.
Sunday, January 24, 2010
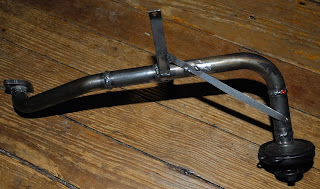
Oil pump pickup tube
The pickup tube is complete. I ended up using parts from two pickup assemblies and some new tubing also. I didn't want to have so many joints in it, but I don't have a bender for this size of tubing. When you make this take your time and make sure that it follows the windage tray closely so it doesn't hit the shallow pan. I didn't care for the amount of tube that extended past the point for the braces so I added in a piece of strap to protect the assembly from vibration. Hopefully this design is adequate because if it breaks the motor isn't going to be happy with me. I'll finish the oil pan this week and post some pictures. By then the rest of my parts for the turbo manifold should be here and I can get started on that. Here are a couple of pics of the pickup tube.
Wednesday, January 20, 2010
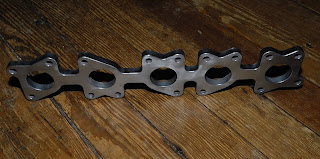
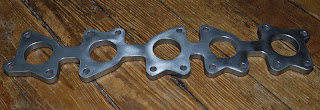
Exhaust manifold flange
Well I had every intention of making my own manifold flange from some bar stock to save some money and also to get one in mild steel. However I am running out of time to get this project wrapped before the autocross season starts and just happened to notice that EFI Express is now carrying one in mild steel. So I ordered one from them at the end of last week. This thing is nice! If you need one in mild steel this is the only place I know of to get it. If your tastes are stainless, then 034 Motorsports can hook you up. Here are two pics I snapped for you guys.
I almost have the oil pan finished up I just need to wrap up the pick up tube assembly before I weld the back of the pan into place. I'll drop it off at the powder coater as soon as it is finished. Also on the way are some Tial products and the t3 flange.
Subscribe to:
Comments (Atom)
